Crochet inspiration – the rose

Peach roseI was inspired by this very beautiful (and very late blooming – it’s now mid winter here) apricot rose and decided to crochet a few of my own…

Only much, much smaller than the original!Crochet rose

Sometimes I love to crochet something tiny.

But big and blousy or tiny and perfect, the pattern is the same… This is the rose pattern I use most often, it’s so easy you can make them in front of the TV – they require very little attention 🙂

Easy Crochet Rose

Use any corresponding hook and yarn – the above rose was made using a 1.5mm hook and crochet thread. For DK weight yarn use a 3 or 3.5mm, for worsted weight yarn use a 4mm…

Row 1:  Leaving a long end, chain 40.

Row 2: Dc into the sixth chain from the hook, *ch2, skip one stitch, dc into the next stitch*. Repeat between * and * to the end of the row.

Row 3: Create petals: chain 2, turn, *6dc into the ch2 gap of the previous row, sc into the top of the dc of the previous row*. Repeat between * and * to the end of the row.

Finishing: Twirl up and sew together, weave in ends.

Crochet rose

I think I’ll make another the same and attach them to bobby pins for Maia. What’s inspiring you right now? J – xo

The easiest crochet slippers

These are the easiest version of a crochet slipper… they make up very quickly and use very little yarn. Its best to make them with the wearer present (at least for the first one), that way you can make a custom fitted slipper which is perfect!Crochet slippersEasy Crochet Slippers:

1. Chain 4 an join with a slip stitch to make a circle. Chain 1 and sc 7 (8sc total)  times into the circle – do not join, you will work in continuous rounds.

2. 2Sc into each stitch around (16sc).

3. 2sc in the first stitch, 1sc in the next, repeat around (24sc). How many more increases you need to make depends on the size of the foot and the weight of the yarn. Carter’s slippers were made in DK and a 3.5mm hook, which fit his 4 year old feet perfectly. Maia’s were made with a worsted weight and a 4mm hook and this same size fit her 6 year old feet perfectly. Remember you want them to be quite snug because they are going to stretch with wear.  If you are making more increases, they would go like this: Round 4: 2sc in the first stitch, 1 sc in the next 2 stitches, repeat around. Round 5: 2sc in the first stitch, 1 sc in the next 3 stitches, repeat around. Round 6: 2sc in the first stitch, 1 sc in the next 4 stitches, repeat around.. etc etc.

4. From here on just work 1 sc in each stitch around.  Keep working in rounds until the slipper is long enough to reach us far as you like up the foot. I’ve noticed that it’s quite ‘trendy’ to make a slipper which stops about mid arch, or even lower.  But beware, these will slip off at every opportunity!  Don’t be seduced by the low fitting slipper, friends… especially if you are making slippers for a child. Anyhoo, when you are satisfied with the length of the slipper, do not fasten off. You will now be working backwards and forwards in rows to create the remainder of the slipper: Crochet slippers free pattern

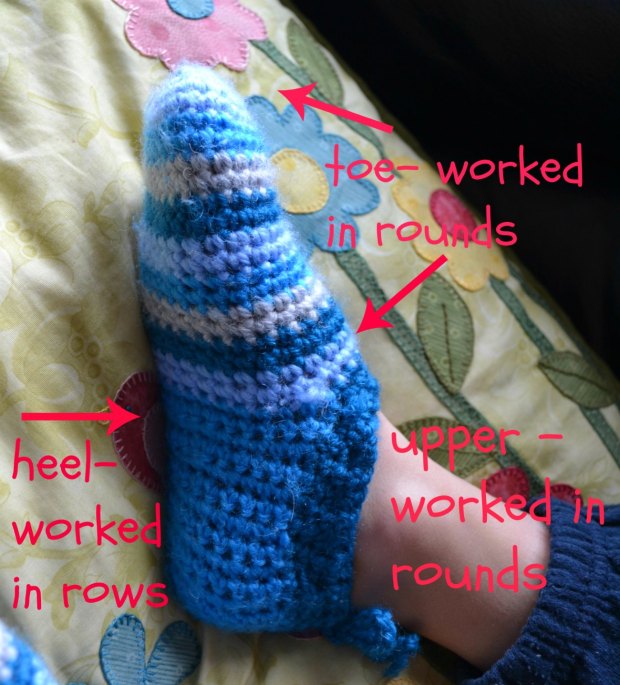
5. Work the first 13 stitches, then turn (leaving 7 stitches un-worked – this will be the top of your slipper) ch 1 and work back across the stitches you just made.  Keep working back and forth until the slipper is long enough, when stretched, to reach the heel. Sew the ends together to form the back/heel of the slipper.

6. Work the upper (above you can see this is slightly darker blue). Work around the top of the slipper heel and along the un-worked stitches of the last row of the toe, making an sc in each stitch around the top of the slipper for 2-3 rows. Fasten off.

7. I like to make a chain tie to secure the slippers on (you can just make out the bow at the back). Chain long enough to reach all around the slipper, then starting at the back weave in a out of the upper all around and leave both long end to tie once the slipper in on.

8. Make another one the same. Weave in all ends…. wear and enjoy!

If you are running low in yarn just make them in stripes…Crochet slippersOf course once Carter had a pair, I had to make Maia some! Instead of making the tie to weave around the top of the slipper, Maia likes hers ballet style, linked in the back and wrapped around the ankle. Otherwise they are the very same, the pattern for the roses can be found here. crochet slippers free patternI hope that’s enough info to make some. They are very easy – really!  If you’ve got any questions leave me a comment and Ill try to help out 🙂Easy crochet slippers free patternHave a lovely day. Janette xx
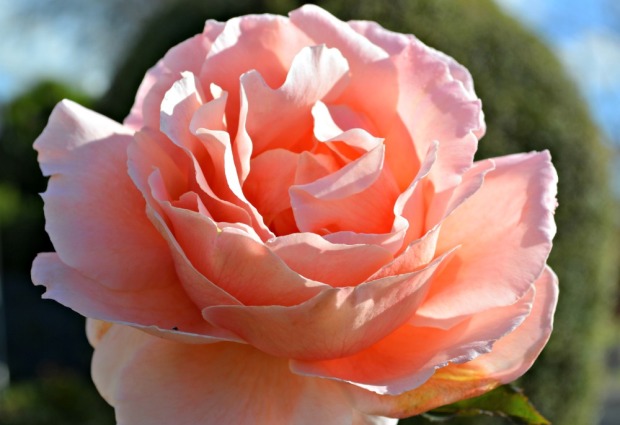
Frilly flowery hair ties

I admit it, I love crochet hair ties. These frilly little flowery ties are quick and easy, not to mention a lovely burst of colour.

Crochet rose hair ties free patternAs you probably know by now I like quick little projects which are satisfyingly easy.  This fits the bill, plus they are so cute!

Frilly Flowery Hair Ties Pattern.

Using a 2.5mm hook, 3ply crochet cotton and a hair band.

Row 1:  Single crochet over your hair band 6 times and then chain 24 more (total of 30 chains). Unfortunately I didn’t take an acceptable photo of this step – but if you check out this post I talk about how to do it (and a photo).  Its pretty easy, just hook under the hair tie when you pull up your yarn so the sc forms around the tie holding it in place.

Row 2: Dc into the sixth chain from the hook, *ch2, skip one stitch, dc into the next stitch*. Repeat between * and * to the end of the row.

Row 3: Create petals: chain 2, turn, *6dc into the ch2 gap of the previous row, sc into the top of the dc of the previous row*. Repeat between * and * to the end of the row.

Row 4: Change to a contrasting colour. Chain 1, 2sc into the top of each dc, ss into each sc to the end of the row. Fasten off leaving a long end.

Crochet flower hair tieFinishing. Coil together starting with the long end and working towards your hair tie. Arrange into a flower like shape and then sew together making sure you sew over your hair tie once or twice more just to make it extra secure:

Crochet flower hair tieAnd there you have it. Back: Crochet flower hair tieFront: A beautiful frilly flower hair tie!Crochet flower hair tieI made two sitting in front of TV last night (hence the photos on my jeans- sorry about that), and left them in a little box on the table for Maia this morning.Crochet rose hair ties free patternShe liked the blue and pink best, but I’m sure Ill be making a few more before the week is out.Crochet rose hair ties free patternAs always have fun, let me know if you have any problems and Ill try to help out!

Jxx

Crochet Rose Ring Tutorial

I made another rose ring today, and I thought Id write a tutorial, so you can make one too.

Crochet Rose RingIt really is a very quick project!

Using yarn of your choice and a corresponding hook, chain 17. Double crochet in the fifth chain from the hook. Chain 1 DC into the same stitch. *Skip 1 chain, DC, Chain 1, DC int the next stitch*, repeat across your chain- you should end up with 7 DC-chain 1-DC pairs.

Crochet Rose RingTurn your work. Chain 3, DC 5 times, ss into the first chain 1 space. Sc into the next space.

DC 6 times, ss into the next chain 1 space. Sc into the next space.

DC 7 times, ss into the next chain 1 space. Sc into the next space.

DC 7 times, ss into the next chain 1 space. Sc into the next space.

DC 8 times, ss into the next chain 1 space. Sc into the next space.

DC 9 times, ss into the next chain 1 space. Sc into the next space.

DC 10 times, ss into the next chain 1 space. Sc into the last space. Fasten off leaving a long end.

Crochet Rose RingRoll up your rose, starting with the smallest petals in the middle and finishing with the largest petals on the outside.

Crochet Rose Ring
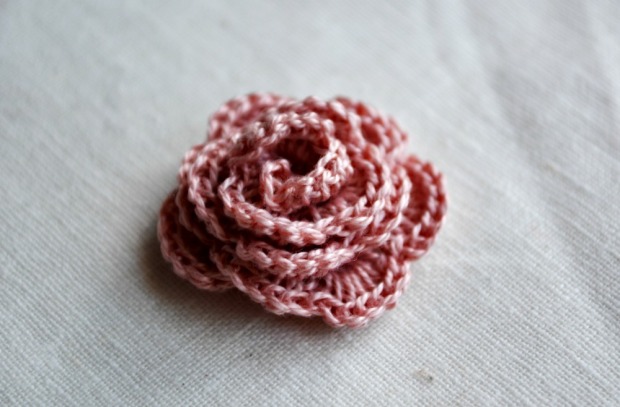
Sew your rose together securing all petals using the long end.

Crochet Rose RingCrochet leaves, to do this all I did was join a green yarn and chain 10 then slip stitch it back into the starting chain, repeat for as many leaves as you like.  Tie your ends together, and then weave all ends in.Crochet Rose RingI brought a pack of rings from spotlight for about $4, they have a large surface with holes which makes them perfect for crochet embellishment.Crochet Rose Ring

Using a small needle and thread sew the rose to the ring:

Crochet Rose RingThat’s it, all done!

Crochet Rose RingIf a ring is not your thing, this would also make a nice brooch (not too big), or hair tie.  I made one for Maia, simply sew the rose securely to the hair tie before you weave in your ends.

Crochet Rose RingCute! A hair tie…

Crochet Rose RingOr a ring…

Rose ring crochetHave a rosy rest of your weekend!
Janette xoxo