 If you are a regular follower you will immediately notice that these bunnies are very closely related to some particularly cute owls made recently. You see a distant aunt on their mother’s side fell in love with a completely unsuitable (if you are an owl) rabbit… the rest, so they say, is history. Rabbits, as you well know, breed like, well, rabbits and before we knew it there were not one, but four new members to the family. If you are interested in meeting the owl family please be sure to check out the New Zealand branch here and the original English pattern here – over at Bunny Mummy no less!!!
Right, on with the tutorial. If you would like to make some bunnies of your own for Easter you will need:
- Various scraps of yarn and a corresponding hook – I used 8ply and a 4mm hook.
- 2 x 9mm safety eyes (or beads or buttons)
- A very small amount of black crochet cotton or embroidery floss
- A needle to sew your creation together with.
 Round 1: Make a Magic Circle and chain 3, then crochet 13 DC into the circle and pull tight, join with a SS to complete the round (14 DC). I’ve had a few questions about the magic circle before, it’s my preferred way to start a round. You can find a video showing how it’s done here. If you prefer chain 4 and DC into the fourth chain from the hook (then your DCs) or chain four, join with a SS to form a ring and then chain 3 and 13 DC into the ring. All techniques work equally well, I think it just comes down to preference.
 Round 2. Join yarn in space between two DCs, chain 3 and DC in between the same space. 2 DC between each stitch around, join with a SS to the top of chain 3 to complete the round. Fasten off.(14 2DC pairs).
 Round 3. Join yarn in space between two pairs of DCs, chain 3 and 2 DC in same space. Make 3DCs in each space between two pairs of DCs around, join with a SS to the top of chain 3 to complete the round. Fasten off. (14 3DC pairs).
 Round 4. You are now working in the top space between each stitch, not the space beside the stitch. Join your new colour through the top loop of the stitch only:
 The round goes like this: Chain 2, 2DC into next stitch, 1 DC into next, 1 DC into next, 2DC into next stitch, 1 DC into next, 1 DC into next, 2DC into next stitch, 1 HDC into next, Chain 1, SC into each remaining stitch around. Complete round by joining with a SS into the Chain 2. Do not fasten off.
 Round 5. Chain 1, SC into each stitch around. SS into chain 1.
 Round 6. Chain 1, HDC in next 11 stitches, chain 1, SS into next stitch. Fasten off leaving a long end to sew your two bunny halves together.
 You need to make two of these (they are the bunny front and back!).
Ears. Make 2:
You can find more detailed instructions for the ears here.
- Magic circle (see notes above), CH 1 and 6 SC into the circle, do not join this or any round, continue working in a circle without joining. Use a stitch marker if necessary tp mark your rounds (personally I just count the stitches) (6)
- *SC in the next stitch, 2 SC in the next stitch*, repeat between * and * around (9).
- *SC in the next 2 stitches, 2 SC in the next stitch*, repeat between * and * around (12). Change colour.
- *SC in the next 3 stitches, 2 SC in the next stitch*, repeat between * and * around (15).
- SC in each stitch around (15). Change colour.
- SC in each stitch around (15).
- SC in each stitch around (15). Change colour.
- *SC in the next 3 stitches, 2 SC together (decrease) in the next stitch*, repeat between * and * around (12).
- SC in each stitch around (12). Change colour.
- SC in each stitch around (12).
- *SC in the next 2 stitches, 2 SC together (decrease) in the next stitch*, repeat between * and * around (9). Change colour… Remember to use the same colour as your outer bunny body colour.
- SC in each stitch around (9).
- SC in each stitch around (9).
- SC in each stitch around (9). Fasten off and leave a long tail to sew to bunny.
 Muzzle. Using White yarn:
Make a magic circle and chain 3, 12 DC into the circle. Pull tight and join with a SS to complete the round. Using black embroidery floss or crochet cotton (two strands), sew the nose triangle…
 and across the top to neaten, and then the mouth:
 Tail. Using a fork (yes a fork!), wrap yarn around 40-50 times
 Tie between tines 2 and 3 to secure, and cut edges… roll between your palms to puff up a bit and trim as necessary.
 That’s all your bunny parts assembled…. now to put them all together.
 Sew muzzle in place.
 Position eyes, and secure.
 Sew tail securely.
 Then with wrong sides together sew your two bunny halves together. I like to just catch the inside two edges of the opposite stitches…
 Leave a small gap and fill as desired…
 Then stitch the last little bit closed, secure your thread and fasten off.
 Looking a little weird…
 Sew on ears. I like to work right through from back to front, first all the way across then back in the other direction. First one….
 …and then the other… hey, he’s pretty cute, huh?
 But don’t stop with just one… make a whole family:
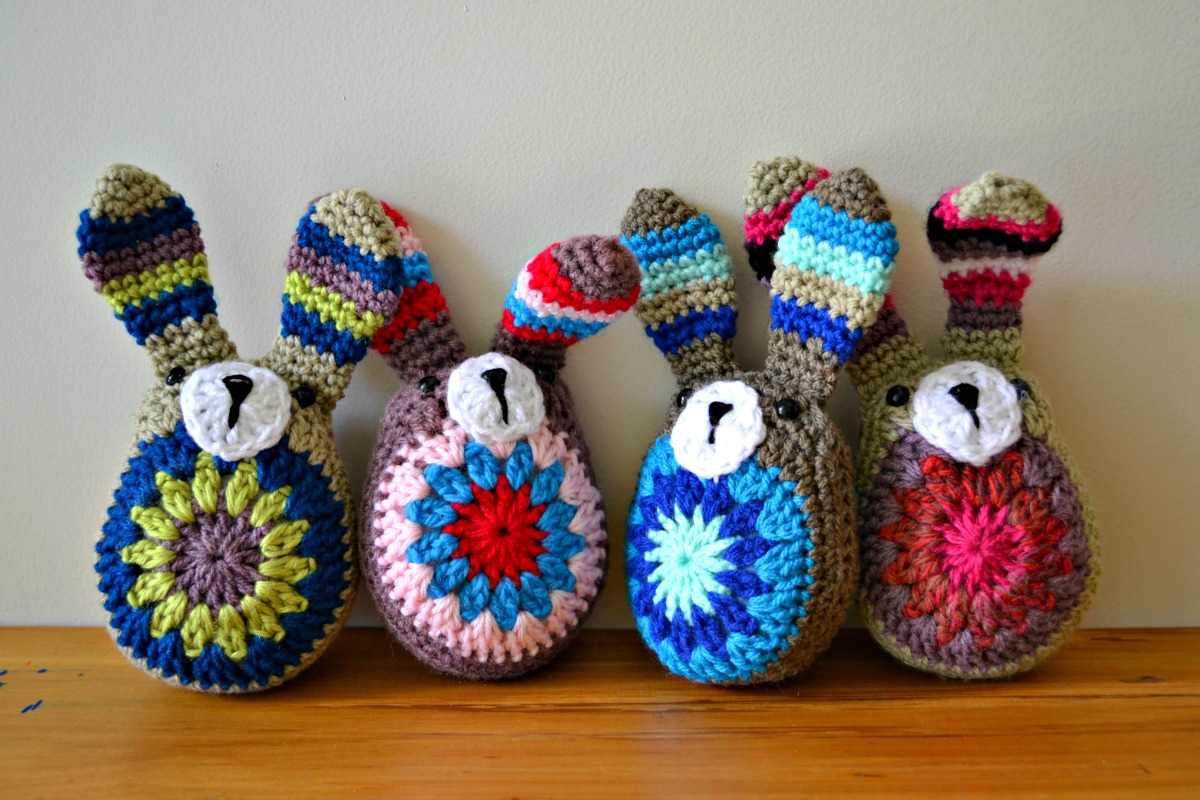 Just in time for Easter…
 They are sure to make a kid you know smile!
 As always, let me know if you notice anything amiss or anything is unclear. Enjoy, and do send me a pic if you make one or three, I love love love to see what you have made!!!! Janette x x x

So. Incredibly. Cute.
LikeLike
Have just completed one of your adorable bunnies. Many thanks for this lovely well written pattern. Now for the next one. Cheers😊
LikeLiked by 1 person
LOVE these and have plenty of scrap yarn left to make a few for the kids 🙂 thank you for the wonderful tutorial!
LikeLike
Very beautiful !!
LikeLike
Reblogged this on Joyful Mama Designs and commented:
Had to share this wonderful tutorial from the Green Dragonfly. Love it!
LikeLike
Janette, how lovely! Just as the first pic promised 🙂
LOVE them!
LikeLike
I am SOOOO gonna make these!! Thank you Janette!!
LikeLike
The bunnies are adorable
LikeLiked by 1 person
Thanks for my newest addiction. Really have only made two so far but I am not finished… Thank you for sharing the pattern.
LikeLike
These bunnies are completely adorable – I think I’ll be making a few of these myself. Thanks so much for another wonderful tutorial.
LikeLike
Cute introduction. Your demo’s are so easy to follow. Thanks! Marie
LikeLike
Thank you for this great tutorial! I’ll make one for sure.
LikeLike
Thank you so so so much for the idea ,and the pattern .I crocheted 11 bunnies and prepare a basket of them.I arrange them by sewing them together arround a crocheted basket, I crocheted feet for all bunnies .inside the bunnies i put half of an egg, (decorativ egg).I put in the basket small egg choclates.
LikeLike
Goodness me, 11… you must have been busy to get 11 made in time for Easter. I hope everyone you made them for loved them too!! Jxxx
LikeLike
These bunnies are so sweet. I have never crocheted but I think I will give your excellent tute a go. Thanks for sharing and the delight on your young man’s face is beautiful.
LikeLike
Wonderful bunnies and crochet- two of my favourite things brought together in one gorgeous design. I know what I will be making tomorrow! After I’ve finished the duck I started knitting today! Love it!
LikeLike
These are adorable!
LikeLike
Oh so adorable! And a great idea for yarn scraps.
LikeLike
Thanks for the cute pattern. it is so cute!!
LikeLike
I have not the right words to say how much I like these bunnies!!!!! They are beautiful Janette!!!
Thank you for sharing this amazing pattern with us!!!!
love, xxxx Ale
LikeLike
If anything exists that is more Easterish or sweeter than those Bunnies, I would like to see them!!!! They are just wonderful. I HAVE to make some.
LikeLike
You guys say the sweetest things, Im so glad you love the bunnies as much as I do!!!!! Janettexxxx
LikeLike
So gorgeous! They’d look lovely nestled around the bottom of an Easter tree, guarding the eggs 🙂
LikeLike
Very cute, thanks for sharing!
LikeLike
Really beautiful!!! My niece, nephew and my kids will love them. Thanks for sharing!
LikeLike
My youngest grand daughter adores bunnies and will be so thrilled with one of these. Thanks for sharing!
LikeLike
Love love love them! THanks so much for sharing!!
LikeLike
Very cute! Love the colors.
LikeLike
Adorable! I’ll be making a few of these!
LikeLike
I love these! The are so cute! Thank you for sharing a wonderful tutorial! All the pictures really help me. I have been crocheting for a few years, but I am new at making animals. I don’t have a blog, but I shared it on my facebook.
LikeLike
Thank you these are so very cute!!
LikeLike
These are so adorable! I can wait to make up a few of these. One question, should the yarn be the same weight all the way through? or does it really matter if I have some 3 and some 4?
LikeLike
It would be ok if they were close to the same weight, too bigger weight difference could cause problems
LikeLike
thank you for the pattern.. will try the pattern out soon.. thanks for sharing.. cheers
LikeLike
These are so adorable!! Thank you very much for posting!!!! :). 🙂
______
Lee Ann H
Crochet…Gotta Love It! Blog
Crochet…Gotta Love It! Website (crochet names and rosary patterns)
LikeLike
I love this! Definitely need to have a go – though knowing me I’ll be finished by next Easter!
LikeLike
please add a printer friendly button
LikeLike
I just finished a crochet project and I think these will be next on the list! I think each of my nephews and neices need one of these for Easter 🙂
LikeLike
They´re lovely!! Thanks for sharing.
LikeLike
Just made my first “Nibble, Nibble, Hop, Hop”… Love it! Plan to gift it to the LYS owner’s baby…

Thanks for such a quick and easy pattern!
LikeLike
Awesome, I love the colors you chose… So eastery!! Thanks for sending me the link! Janette xxx
LikeLiked by 1 person
Hi I really love the bunny,but I cant understand how to make the ears without joining the rows. I am a experienced crocher? but I am still confused anychance you could write it down in another form perhaps
LikeLike
Hi Angelique,Im sorry you are having trouble. Do you pull the first round really tight? Why don’t you try joining that round and not joining the next ones and see how that works out? If you really have trouble you could just join as you go, it shouldn’t alter the pattern too much. Janette xx
LikeLike
HI, Ive added more detailed instructions here; https://thegreendragonfly.wordpress.com/2013/03/24/ears/
LikeLike
I loved making this rabbit: http://jillgoldberg19.wordpress.com/2013/03/08/rabbit-on-the-run/
Thanks for the inspiration, as always. You are amazing 🙂
LikeLike
Thanks for sharing Jill, I love your bunny she is gorgeous! Jxx
LikeLike
Adorable!! Thank you for sharing
LikeLike
Love your bunny… but I can’t understand the instructions for the ears I have reread them plenty of times and still get nowhere can you please help me
Cathy.
LikeLike
I’m in the same boat as Cathy. I have been crocheting for years and I must be missing something because I just know what I’m missing on the ears. I have tried it over and over again. Please help! thank you!
LikeLike
Hi Joanie, I’ve just added some more detailed instructions:
LikeLike
Hi Janette, the bunny is absolutely fab ! Thanks for the photo tutorial, The photo that shows the bunny before attaching the ears looks like a beaver doesn’t it? I’ll start making bunch of them tomorrow.
Cheers
Annie.
LikeLike
These are absolutely precious and so easy and fast to make…LOVE THEM!!! Thank you for sharing the pattern Janette 😉
LikeLike
Hehehe! I had a chaotic incident while working on your awesome bunny project here and I had to blog about it, just so ya know! I used your bunny picture so my followers would know what project I’m talking about but I was sure to link it to your blog and tell them where to find it! 🙂 You are so creative! I love these bunnies! I’m gonna make one for my mom, grandma, and great aunt! http://craftyghoul.com/2013/03/11/anarchy/
LikeLike
I finished the bunnies for my mama, grandmother, and great-aunt! They are going to be so happy and these are going to make their day, letting them know I think about them and love them! Thank you so much for your tutorial. I blogged about the bunnies and put up pictures and I was sure to blab on and on about how awesome you are and where my crochet pals can find you! 🙂 IF it’s okay with you, I’d like to make three more of these for the kids at my church. They’re going to have a little party-type thing for Easter and are asking everyone to donate candy and little prizes, and I am kinda stuck on what I’m able to do to help out sometimes because of my severe agoraphobia limitations. I say three more because my brain rebels after a few repitions of projects, lolz! Oh, yeah! And here’s the link to the blog and pictures of the ones I made for my loved ones: http://craftyghoul.com/2013/03/12/finished-bunnies/
LikeLike
thank you so much– always so many pretty things to find here. 🙂
LikeLike
Super cute! Linked to your pattern on my blog this morning! 🙂 http://www.mooglyblog.com/hop-into-spring-with-crochet-bunny-patterns/ Thank you for sharing your pattern!
LikeLike
Thank you so much for sharing! Janette xx
LikeLike
Thank you so much for sharing this great tutorial! I just love them! I can’t wait to make them for some crochet friends I’m in an Easter swap with 🙂
LikeLike
Thank you Janette – my granddaughters will love these!
LikeLike
These are adorable. I’m just working on a sock rabbit – well, you know how it is, socks are knitted in Winter, Spring follows Winter, so this is a sort of segue in knitting. : ) I’m not quite up to your beautiful pictures and well planned tutorials but I’ll be showing off the finished item probably end of next week. Thanks for sharing!
LikeLike
adorable!!
LikeLike
i want one….too cute!
LikeLike
I spent all day making my little bunny and I love it so much! I wish I could make another one tomorrow, but I have things I need to do! I’d like to send you a pic but can’t find your email address.
LikeLike
HI Christine, my email (its on the about page) is janettewise (at) me.com. I cant wait to see your bunny! Jxx
LikeLike
these are the cutest!!!! can’t wait to find my Easter bunny yarn colors and get started
LikeLike
I LOVE IT!!! THANK YOU!!!
LikeLike
I LOVE these! ❤ I really need to make one. Best bunny pattern I have seen yet! ❤
LikeLike
Last week I made a couple of owls and tonight I made my first bunny. So cute! Best wishes, Tammy
LikeLike
http://tsdailytreasures.blogspot.com/2013/03/assembling-parts.html
LikeLike
Hi Janette I saw them and couldn´t resist to crochet them right now, these´re my bunnies. Thanks for the pattern, I like more than owl already. http://magnolica.blogspot.com.ar/2013/03/conejos-de-pascua.html and I´ve shared on pinterest board too 😉 I hope you like them.;)
LikeLike
Very sweet. Bunnies just right for the current season.
Hmm wonder if I will get one done before Easter.
Thanks for sharing.
LikeLike
Dear Janette!
These bunnies are soooo cute. The third one is being crocheted for my eldest son (age 7).
Some of my friends do not speak English well, but in any case they would like to prepare the bunny. With your permission I would like to translate into Hungarian.
Thank you!!!
Kriszti (from Hungary)
LikeLike
HI Kriszti, of course that would be lovely! Thank you, Janette xx
LikeLike
Thank you!!! I will send you when it is ready.
LikeLike
Wow, they’re so cute! ♥ Thanks for the pattern :-)). Happy weekend!
LikeLike
I love your bunny! I made one and I have wrote about it in my blog: http://embolicalatroca.blogspot.com.es/2013/03/conill-de-pasqua.html
Thanks for your instructions.
LikeLike
These are adorable. I made one and it was so cute I made 6 more for the neighbor children. Thank you for the time you spent on the tutorial as well.
LikeLike
Yay I just finished with my bunny!! Thank you so much for sharing your pattern!! I can’t wait to make more of these cute critters!! I love the expression on your sons face too!! Hugz, Lisa
LikeLike
Oh my goodness these rabbits are so cute! This pattern will definitely go on my “to do” list, I think my 1-year-old would love one. 🙂
LikeLike
Thanks for your pattern, they are so cute!!
LikeLike
Jeannette, el turotial está súper bueno ¡Más que bueno!, gracias por compartirlo, trataré de hacer estos conejitos de sorpresa para mis hijitas, y ya quiero ver la misma sonrisa de tu pequeñito en sus caritas.
Un abrazo.
LikeLike
Hi Janette, I have just shared your bunny pattern link with my favourite Facebook crochet group, good stuff that’s worth sharing. Thank you for sharing this super cute bunny pattern 🙂
LikeLike
je suis sous le charme de ces petits lapins c’ est vraiment trop craquant!! je vais essayer de les faire et ne vais pas manquer de te prévenir je posterais sur mon blog i tu veux viens t’ inscrire a ma niews et comme ça tu ne loupera pas mes posts je m’ inscrit chez toi si ce n’ est déjà fait biz
LikeLike
I just finished a big project and I am so excited now that I have some time to make these bunnies! I haven’t made any stuffed animals before and I think this is the perfect one for me to start with because you have done such a wonderful photo tutorial. Thank you so much Janette!
LikeLike
Oh my! These are sooo cute! I have a lot of scrap yarn lying around. Will definitely make some for my kids! They’ll LOVE them! Thank you for sharing 😀
LikeLike
I completed 4 and blogged about it!
http://jaimeddesigns.blogspot.com/2013/03/do-bunny-hop.html
Feel free to check it out!
Thank you for the great pattern!
LikeLike
Love this!
LikeLike
This is a FABULOUS design and pattern (spotted it on my ravelry group)…am going to give it a go and will share in the Attic with a link back here. Wonderful stuffxxxxxxxxxxxxxxxxxx
LikeLike
Thank you for sharing your pattern. They are so cute :o)
LikeLike
thank you very much for this! I make for the children near my house, here, in Egypt!
i send you sun from the Nile
Marie
http://marieluxor;canalblog.com/
LikeLike
Thank you for sharing 🙂 Hoping I have time to whip a few out before Sunday…
LikeLike
well my hook is better than my english! I did it this afternoon and the picture is on my blog!
Thanks a lot for this pattern. I really enjoyed doing it!
Malilène
LikeLike
These are so cute! As soon as I am finished telling you how great these are, I am grabbing my scraps and a hook and making bunnies! I love these! Is this pattern available in a pdf?
LikeLike
Very cute!!!!
Thanks for sharing!
LikeLike
Merci pour ce magnifique tuto, réel plaisir à crocheter 😉
LikeLike
Love them. Cant wait to make one or two or three … Thank you for sharing pattern.
LikeLike
I am here from Attic 24 and will stop by often. I should do a bunny for my friend who is coming to spend Easter Sunday with me.
LikeLike
Your bunnies are so cute! Thank you so much for sharing!
LikeLike
Hello Janette!
Thank you for this lovely pattern! I started crocheting some of the cute bunnies for my daughters. They will sure love them! I linked your post onto my blog: http://kardiomuffelchen.blogspot.de/2013/03/crochet-pattern-easter-bunny-basket.html#axzz2OMJIFrzi
Sending you love from Germany,
Lucia
LikeLike
Hello Janette!
Thank you for this lovely pattern! I started crocheting some of the cute bunnies for my daughters. They will sure love them! I linked your post onto my blog: http://kardiomuffelchen.blogspot.de/2013/03/crocheting-cute-bunnies.html#axzz2OMJIFrzi
Sending you love from Germany,
Lucia
(Pls feel free to remove my first comment, I pasted the wrong link to my blogpost… 😉 )
LikeLike
so cute… Thank you for the tutorial. I will try to do, and will sent you the photo of my result…
LikeLike
I love crocheting and I love amigurumi, but what I love even more is how different these are! I want to make an entire army of them!!!! It will be cute overload! ❤ Thank you for sharing this pattern with us and for having such adorably clear pictures!
LikeLike
Thank you for sharing your pattern with us. The bunnies are adorable 🙂
LikeLike
I just started crocheting this year. I think the pictures will be a great help to me if I give these a try. I think they are the cutest things. thanks for sharing the tutorial.
LikeLike
These bunny’s are so cute, last night I followed a link from attic24 and started one pretty much immeditely, very nice instructions. I had to laugh this morning whn I openned an email from wordpress telling me you had liked a post on my blog, followed the link in the email and was back at the bunnies again, I just thought it was a bit funny. Thanks for the pattern.
LikeLike
I love the bunnies and made mention of them on my blog along with a link back to your blog. I hope that was OK. Let me know if you would like me to take it down.
LikeLike
Gosh these are so cute! I’d love to make some – would you mind if I blogged about them? I’ll of course provide a link to here.
LikeLike
Thanks for the pattern….just in time for Easter. I wonder if you are able to help me troubleshoot my problem? In my 3rd ring of the bunny tummy, the 3x dc turns into ripply waves. The circle would never lie flat like yours. Even when I switch to 2x dc in the 3rd ring it is wavy. Any idea what I am doing wrong? Any help would be greatly appreciated. Thanks a bunch, Keri
LikeLike
Hi, I suspect you are using too small hook for the size yarn. Or maybe you have used a lighter yarn on the first couple of rounds and a heavier yarn on the outer round?
LikeLike
Thanks Janette, that would be what I thought too. Except that it is dk with a 4mm hook, all the same yarn. It still happens even if I up my hook to 5.5mm – not as severe…but, still bad enough not to flatten. Keri
LikeLike
Love the bunnies! Will have to make some for the grandkids! Thanks for sharing!
LikeLike
Hello Janette,
thanks a lot for that great pattern! I made a whole bunch of them – for my kids, my godchild (and one just for me). That will be Happy Easter for them! I also took some photos to share your link and to show you on my crochet-blog: http://haekeln-im-quadrat.blogspot.de/
It was so much fun to crochet these sweet bunnies – absolutely great!
steph
LikeLike
Thank you for the wonderfull free pattern. you can visit my blog and see one of this beautiful bunnys i made. greatings AnnA
http://annaskreativblog.blogspot.co.at/
LikeLike
Adorable! I’ll make one for my daughter, thanks for teaching us! Greetings from Buenos Aires, Argentina, and Happy Easter!
LikeLike
Dear Janette,
Adorable bunnies! Thank you for this tutorial! Reblogged it and translated the steps into Hungarian to my friends: http://thelazars.blogspot.hu/2013/03/husvetra-hangolodva-pufok-nyuszok.html#more
Happy Easter!
LikeLike
I just made 2! Super easy and cute!
LikeLike
Thank you so much for this adorable pattern. I am trying to finish three for my kids’ Easter baskets on Sunday!
LikeLike
Reblogged this on A Random Harvest and commented:
OK, all you crocheters, here’s a Too Cute Alert!! And do check out her owls, too! I haven’t made time to create any of these, but they are on my list! Have fun! ~ Linne
LikeLike
Janette, these are so cute, I just HAD to reblog your post. Hope you don’t mind (and if you do, please let me know asap!). These bunnies, and the owls, are fantastic and I will be making some of each in the near future. I’m busy with hand-sewing at the moment. I’ll be showing them to a fanatical crochetting friend, too. She’s going to drool for sure.
Thanks for such great tutorials! ~ Linne
LikeLike
Thanks you ! J’ai réussi à suivre vos explications et mes filles vont avoir un petit lapin pour Pâques.
LikeLike
Thank you so much for these SuperUberCute bunnies! I made 3 of them so far but know there will be more to come 🙂 I just blogged about it and put a link to your blog.
Blessings, Esther
LikeLike
Love this bunny, a bit different to the usual. Made one this week, just in time for Easter, Had a bit of trouble with the ears, but soon got the hang of them- just follow the instructions and COUNT!!! Linked to you on my blog and thank you so much for excellent tutorial and great idea! Lisa x http://www.handmade-homemade-lizzy.blogspot.co.uk/2013/03/easter.html
LikeLike
I have included your bunnies into my Inspire me post. I adore them.. 😀 Happy Easter everyone 🙂
LikeLike
Je découvre un peu tard , ces jolis lapinoux .
je garde sous le coude ce tuto si bien détaillé , MERCI Beaucoup :):)
♥ Joyeuses Fêtes de Pâques ♥
LikeLike
Soooo cute! You can see mine on FB @ madebymeinmykitchenx 🙂
LikeLike
Love these! So colourful too … =D
LikeLike
LOVED making these little guys! Reposted your pattern on my blog.

Here’s my little bunny family…
LikeLike
Thank you again for this worderful pattern. Here is my bunny twins. My little son love them – they are his “doudou”)
http://madametrico.canalblog.com/archives/2013/03/31/26785601.html
LikeLike
Your bunnies are so cute. I also love the picture with your son holding them and that beautiful tablecloth! 🙂
LikeLike
Thank you… The beautiful tablecloth was brought from Iran (the gift of my mother in law)
LikeLike
Omg… I just finished one…….love it :). Gracias ,,,,, I had so much fun making this cute bunny …
LikeLike
Have just the ears to go, I will be then a proud owner of a rather a belated Easter Bunny! Thank you
LikeLike
I just finished 2 of these adorable bunnies for my grand kids. They came out so cute my husband even loves them! Will definitely be making more of these. Thanks so much
LikeLike
Hi Carrie, sorry no newborn designs just yet 🙂
LikeLike
Reblogged this on La Birdie's Crafty Corner and commented:
Love love love this bunny! Too late for Easter tho): oh well next year!
LikeLike
I keep seeing these bunny’s pop up everywhere and now I’ve found the pattern. Too cute!! 🙂
LikeLike
Just had to write & tell you how much I enjoyed making the crochet bunny! What a great pattern! I made the first one (you can’t stop at one!) with a gray body & a pink, cranberry & aqua tummy & on the ears. My husband says it has an American Indian look.
The second one is my chocolate bunny! He is chocolate brown (of course!) with a hot pink, white, light pink (chunky/fuzzy yarn) tummy & a pink nose. No color on his ears. And, I curved one of his ears down & gave him a pom-pom chocolate brown tail.
I’m sorry, but I don’t know how to post photos to you, but hope the descriptions give you an idea. They were so much fun to make & the pattern was easy to follow! I love the fact that the body is egg-shaped, too – or, at least mine are! Lol! I think these would be great for babies & toddlers!
Thank you for such a wonderful pattern!
LikeLike
Made them for my kids for Easter. they’re here http://al-wrightbeingus.blogspot.com/2013/04/autumn-is.html
My boys (8 year olds) wanted to know how the Easter Bunny learnt to crochet 🙂
LikeLike
Cute cute cute…100times
♡big thanks
LikeLike
I made one for my little princess! You can see it here: http://elblogdeceles.blogspot.com.ar/2013/04/162013-conejo.html Thanks for the pattern!
LikeLike
I made 3 of these over the weekend, the pattern was easy to follow and easily memorized so i didn’t have to keep looking over every few stitches. I’ll have to send over a picture of the ones i did make, bf wants one now too! Thank you!
LikeLike
BRAVO les lapins sont adorables…….SUPER
LikeLike
Thanks for the pattern, made one for my nephew, he loved it!
Will try the owl one next!
LikeLike
Very sweet and genius way to make the puff tail!
LikeLike
How cute! I just found this pattern to you or your link to this pattern (?). In my mind, since I missed Easter use, I will definitely try to get 3 done for baby showers! perfect for little ones to hold and not hurt themselves with either. (will change eyes out though for stitched). Thank you for sharing!!!
LikeLike
너무 이뻐요 ^^
so so lovely~~~~:)
and so much thanks ^^*
LikeLike
http://postimg.org/image/j2zdbwmq1/
My colleague and me are going to make 10 for all the children in our families. Here are mine 🙂 Thanks for a great and free design!
LikeLike
They are awesome! Thanks did the pic xx
LikeLike
I am Ha. I’m from Vietnam. It is so happy to find your blog. You are so talented. You light up my life. Thank so much.
LikeLike
Hi Ha, thanks for your comment, Im glad you like it!!! Janette xxx
LikeLike
Thanks so much for this fun pattern! I’m making mine with Everyday self-striping yarn so that I don’t have to change colors – the yarn does all the work! They’re very, very cute, and I love them muchly. Thanks again!
LikeLike
I love them! I’m going to make one for a friend (tomorrow is her birthday). Thanks a lot for sharing =)
LikeLike
Oh Janette these are adorable. Having just lost our beloved baby Myrtle French lop bunny yesterday :'(( the children were besides themselves, particularly my youngest boy who is 7, and I’m wondering if I can gather myself together if I could do justice to one of these and make one or two of them for my boys…. I think they’d love that. Not sure if you we’re inspired by having your own rabbits or not? But they are so sweet. Kate xx
LikeLike
Im sorry you lost your bunny! I love rabbits and would like to get some soon. We have chickens and a cat which keep us busy and entertained- maybe this spring 🙂
LikeLike
Oh thank you Janette. It was so sad particularly as she was so little but you should get some, they make lovely pets and my children love them. We lost our French lop and the other 3 we have are mini lops….thoroughly recommend them xx
LikeLike
Are they boys or girls? I presume you need all of the same sex?
LikeLike
I have (well, had) two pairs, boy and girl in each. Ideally, a boy and girl are best pairs to have as much less chance of fighting. Even same sex pairs who are siblings can start off ok but as they mature can then start fighting, particularly boys! I always have them neutered (boy first before sexual maturity) unless you get a rescue pair that have bonded already and have been neutered/spayed. I had two brothers, both were neutered but one ended up bullying the other non stop so had to separate! Now have little Merlin on his own so will have to look for a companion now! K x
LikeLike
These are adorable! I am looking for easy projects to crochet over the next 9 months for a fundraising campaign (basically, whatever I manage to crochet over the next 9 months will be auctioned off for charity – it’s a Pregnancy related charity hence the 9 months). So before I start making some of these I just wanted to check whether you would mind any I manage to make being sold for charity? I’d credit your pattern, of course!
LikeLike
Hi, no problem at all that sounds like a lovely idea! Janettexx
LikeLike
I was curious. Can we sell the finish product as long as we link and credit you for the pattern? 🙂
LikeLike
Yes you can. Thanks for checking xx
LikeLike
These bunnies are so cute! Your instructions & photos are very clear & easy to understand. I’ll be making some of these for sure.
Thank you for visiting my photo blog! I’m glad you liked my post about “A Visit to a Flutemaker”. Please visit again soon! 🙂
LikeLike
Hi there, amazing pattern and gorgeous rabbits. I’m adding them to a mobile I’m making for my soon to arrive nephew along with owls and other little creatures. Will post a pic when I’m done. Thanks for sharing. :o)xx
LikeLiked by 1 person
Please do, I’d love o see how it turns out -sounds awesome!!! Xx
LikeLike
This is oh – so cute pattern! Thank you very much for sharing 🙂
LikeLike
Your bunnies are so sweet and the tutorial looks so easy…can’t wait to make them, thanks!
LikeLike
Il est trop beau ton lapin…BRAVO
LikeLike
Merci pour ce super tuto
LikeLike
What kind of yarn did you use?
Cotton or acrylic?
LikeLike
Hi, 8ply… DK. A mix of acrylic and wool (I made quite a few!) xx
>
LikeLike
Hermosos! y estupenda la explicacion. gracias por compartirlo!!
LikeLike
Thank you for the pattern!. Is easy and beautiful. This Christmas we have created an event to give amigurumis to children suffering from leukemia, and we used this pattern to weave some of the amigurumi.Thank you, Janette!
LikeLike
They are sooooo cute thank you!!!!
LikeLike
Thanks so much for the great tutorial .
I just made a couple of these lovely bunnies!!
Rose
Pink Rose Crochet
http://pinkrosecrochet.blogspot.com
LikeLike
These bunnies are my current obsession! I can’t stop making them. Thanks so much for sharing!
LikeLike
Wonderful to hear, Im so glad you enjoy them!!!
LikeLike
WoW! I adore these bunnies! I have just made my first one using your pattern. I am hoping to make more and abandon them outside (in clear bags) for people to find, (as a RAK!) coming up to Easter this year! Many thanks for sharing your beautiful pattern. Gez @littlewrencottage
LikeLike
Super cute pattern. I put a link on my blog to your blog. Thanks for sharing the pattern and the excellent photos.
LikeLike
I love to crochet but I m not good at reading would please consider doing a video I really would like to make this bunny
LikeLike
Hi there 🙂 Your bunnies are so lovely! Can I use one of your photos in a post on my blog and share the link to your tutorial?
LikeLike
Hi, you can use a photo to link to the tutorial, but no more than one. Thanks!
LikeLike
I think I’ll use the first one then 🙂 I wouldn’t have asked you to let me use it if I had enough time to crochet one myself and take some pictures. What a pity I won’t manage 😦 Or maybe I will? 🙂 Thanks a lot anyway, both for the permission and the tutorial itself!
LikeLike
Awesome, thanks for checking! I think you could make one, they are actually pretty fast!! 🙂
>
LikeLike
Reblogged this on The Knitting Trucker and commented:
I just had to share as I love these! All I need to do now is learn to crochet!!
LikeLike
These are just so cute! I’m currently working on the first of a pair I’m making as part of my contribution for an Easter hamper, that our local playcentre will be raffling off, for a fundraiser 🙂
LikeLike
Here are my pair: http://i1281.photobucket.com/albums/a510/nyrthak1/IMG_4672_zpsd21f9682.jpg
LikeLike
Gorgeous!!
LikeLike
Great pattern thank you. I have made some for my girls and their cousins http://www.lipstickandlace.co.uk/2014/04/hello-bunnies.html
LikeLike
Hello,
I just made my first one! It is so cute! I can’t wait to make more for all of my friends babies (embroidered eyes rather than using buttons). I was just thinking, as with the owls, there must be lots of animals you could make! I’m going to have a think and will share anything I come up with (and credit you of course) if I do.
Thanks for sharing this!
Emily
LikeLike
Thanks for the pattern making great Easter gifts. Quick easy and fun to make. 🙂
LikeLike
Reblogged this on and commented:
Oggi è Pasqua, molte tradizioni si intrecciano…. uova, conigli e pastiere……
Mi sono imbattuta in questi coniglini pasquali e ho pensato che erano un buon modo per augurare a tutti una pasqua meravigliosa e creativa….. io li vedo azzurri rosa e verdini e voi?
LikeLike
I just love this pattern and the bunnies that I made with it. Thank you so much! Leyla
LikeLike
Just wanted to let you know that I LOVED the pattern, made a bunch of them, and just blogged it. Thanks!!
LikeLike
I would like to thank you for being so generous and kind. You are very creative and your pattern is very clear. Being French speaking I can assure you of that! 🙂
I have made 2. One for my daughter being in California for a Study session at San Bernardino University as an exchange between Montreal Quebec Canada
and the United States and th second one for her coloc. There is no age for these kind of sweetness. At 22 they were so very happy! Merci, Merci beaucoup! 🙂
LikeLike
Sooooo lovely! ❤
LikeLike
Hi. Just a quick question which’ll probably make sense to a more experienced crocheter, rather than me(since I just started.) but For round 3, when you’re double crocheting: do you crochet into the top stitch, or the one just below the top one?
If this isn’t clear, I can send images.
Hope you can help. Love the design and bunnies.
Thank You!! ❤
LikeLike
Hi, I don’t think it actually matters, just personal preference. For a stronger stitch you would go through both but for this it’s just whether you prefer the way it looks (just be consistent for all stitches). Hope that helps! Jxox
>
LikeLike
Thank you for your help!! 😀
LikeLike
i made one, although i can see me making a 100 more, there so super cute
http://deezkatz.blogspot.co.uk/2014/09/ever-heard-term.html
LikeLike
I love this pattern and have already made one with buttons for eyes–so cute! Would you consider retyping the pattern at the end in a concise format so that those of us with out a smart phone or portable internet can take your pattern “on the road?” Thanks for a great pattern!
LikeLike
Being pretty new to crochet, I get lost in some terms. What would be an example of 8ply yarn? I was thinking maybe the Lily Sugar and Cream yarn would be good? I am currently making a bunny with a bulky #5 yarn and a K hook. But my bunny is getting really big!! Let mw know, thank you!! My almost 3 year old can’t wait for me to get the bunny, the chick and the owl done!! Thank you!!!!
LikeLike
Hi Amy, I think that yarn is 10 ply or worsted weight. It doesn’t really matter what yarn you use but as you’ve noted it’s going to be bigger with heavier weight yarn. Ravelry is the best place to check yarn weight etc, hope that helps! Janette xx
>
LikeLike
I’m working on the bunny, but the holes between the second and third rows look big enough for stuffing to pop out. I’m using a 4 MM hook and medium weight yarn. Thanks!!!
LikeLike
Hi, these are adorable, would it be possible for me to make these and accept donations for charity for them? Thanks! x
LikeLiked by 1 person
Thank you SO much for this great pattern! I can’t wait to make one for my wee grandson for Easter!!
LikeLike
Working on my second bunny with two more to go. Love ’em, love ’em, love ’em! Are turning out so well. Thank you for the pattern.
LikeLike
Awesome! Have a happy Easter! Or should that be hoppy!!! Xx
>
LikeLike
Thank you so much for the pattern! I finally finished 8 of the little guys today. I want to find children’s books about bunnies to pair them with to give as gifts to my grandchildren and possibly some future grands.
LikeLike
Lovely idea about pairing them with books! 8 wow!!
>
LikeLike
Reblogged this on adornosmalulu.
LikeLike
These are wonderful! I whipped up 3 for my kiddos and they are delightful. Thank you so much for posting such an amazing pattern for free!
LikeLike
What a cute idea! I had a go at one of them over the weekend and love it. I’ll definitely make some more and pass them on as Eastern gifts. Thanks very much for sharing this lovely pattern! I’ve added a link to it on my blog (hope that was okay): https://strickschnack.wordpress.com/2016/03/07/oesterliches/
LikeLike
Dear Janette,
Thank you for the lovely pattern, it is really cute! Even a beginner as me could make it!
Please see my Easter Bunny Family 🙂
https://picasaweb.google.com/118032425650997127461/MyEasterBunnyFamily?authkey=Gv1sRgCJDDjIa6h925Qg#6265198600416257042
LikeLike
Thank you for sharing they are very cute! Happy Easter!!
Sent from my iPhone
>
LikeLike
Thanks for making such easy-to-follow instructions! Here’s my first attempt: https://www.instagram.com/p/BDViqUPkOOz
LikeLike
♥ ♥ ♥
LikeLike
Just wanted to thank you for sharing this wonderful pattern. I made four of these cuties for some of my granddaughters. They were fun and easy to make and enjoyed by all.
LikeLike
Thanks for your message Lynne, I’m glad you liked the pattern
J x
>
LikeLike
So cute! Thanks for a nice pattern. 🙂 I made one into a rattle. I just put a little plastic container with some rice in it, inside of the bunny, with stuffing around. 🙂
LikeLike
Great pattern, and easy instructions to follow. I had problems getting the ears to stand right when sewing them onto the head, without them looking like frankenbunny! So i ended up sewing them into the seam as I joined the body halves together. I made sure I sewed through between the first and second row of the ears while keeping the body halves lined up correctly. Worked perfectly!
Thanks for your excellent pattern : )
LikeLike
Thanks Karen, that sounds like a great idea. Glad you liked the pattern! x
>
LikeLike
Just wanted to let you know that 6 years after you published this post my children will be getting my attempt at these bunnies in their Easter baskets.
LikeLike
That’s so cool! You made my day 😊
LikeLiked by 1 person
I love making baby movies and would love to make these to attach to them. Would it be okay for me to sell them?
LikeLike
Lovies* sorry auto correct
LikeLike
Hi Destenee, thanks for checking. Yes that would be fine, please note where the pattern came from. Have a lovely day, Janette
LikeLike
https://www.facebook.com/photo?fbid=915143199250579&set=gm.3758343190923399
Hello, I’m from Poland, I’m glad that I found you and I could make Easter bunnies for my grandchildren Antoni 1 year and Jakub 5 months according to your pattern. There are 12 in the picture but I have already made 14 !! and I do crochet all the time, I can’t tear myself away from them. I have modified your scheme a bit and most bunnies have ears that are made straight away, made from head to end without sewing on.
/ sorry for english, google translation /
I greet you warmly and look forward to the next designs
grandmother Ela
LikeLike
Lovely to hear from you in Poland. Such prolific bunny making, I’m glad you’ve enjoyed making them and I hope your grandchildren enjoy loving them!
>
LikeLike
Made this and came out great! I can’t seem to share my pic, though. I’m not sure why.
Thanks for the cute pattern😊
LikeLike
These are just so cute! Will be making a few soon. Thank you for the pattern. Also, since I love owls so much, going to try that pattern, too!
LikeLike
Så fina! Min engelska är väldigt dålig men detta måste jag försöka göra. Du har j lämnat fina bilder också. Tack
LikeLike